Table of contents
- Introduction
- Setting up a React project
- Install Tailwind CSS in the React app
- Add a font awesome icon cdn link
- Create a React Component and style with Tailwind CSS
- Inside the App.JSX file pass the Form component
- The results:
- Import statement
- Compoment declaration
- State Hooks
- Form Submission handling
- Toggle Show Password
- Form JSX
- Conclusion
Introduction
React.js, often referred to as React, is an open-source JavaScript library used for building user interfaces for web applications. In simple terms, it's a tool that helps developers create interactive and dynamic web pages with a focus on providing a smooth and responsive user experience. React allows developers to break down the user interface into small, reusable components. These components can be thought of as building blocks, each responsible for a specific part of the user interface. React makes it easy to manage and update these components efficiently, ensuring that changes in one part of the interface don't affect the rest.
Tailwind CSS is a popular web development framework that makes it easier to design and style websites. It provides utility classes that are pre-designed which you can apply HTML elements enabling you to quickly create customized web pages. These classes help you design your websites without writing many custom CSS codes. It simplifies creating a visually appealing and responsive website by offering a wide range of ready-to-use styles and layout options. In this article, we will see how to create a sign-in page with these two technologies.
Setting up a React project
Follow the guide Scaffolding a React Project using Vite
Install Tailwind CSS in the React app
- Open the terminal and in the project folder run
Then, run:npm install -D tailwindcss postcss autoprefixernpx tailwindcss init -p Inside your folder in vs code locate the file tailwind.config.js write the following code
/** @type {import('tailwindcss').Config} */
export default {
content: [
 "./index.html",
 "./src/**/*.{js,ts,jsx,tsx}",
],
theme: {
 extend: {},
},
plugins: [],
}
This file enables you to customize your project design system. Tailwind uses this file to look for where to generate the CSS file.
Inside the src/index add the following
@tailwind base;
@tailwind components;
@tailwind utilities;
Remove the src/App.css file content. It will not be needed.
Add a font awesome icon cdn link
In your index.html file inside the head tag add this link
<link rel="stylesheet" href="https://cdnjs.cloudflare.com/ajax/libs/font-awesome/5.9.0/css/all.min.css" integrity="sha512-q3eWabyZPc1XTCmF+8/LuE1ozpg5xxn7iO89yfSOd5/oKvyqLngoNGsx8jq92Y8eXJ/IRxQbEC+FGSYxtk2oiw==" crossorigin="anonymous" referrerpolicy="no-referrer"/>
This will help you make use of your font awesome icons.
Create a React Component and style with Tailwind CSS
Inside your src folder create a folder called components where you will add files needed to make your app functional. But for this sign-in page, we will only need a single file. And will name it Form. Inside this form component, we will handle all functionalities of the form using react and style the UI using tailwind CSS.
import React, { useState } from "react"
import axios from 'axios'

const Form = () => {
    const [email, setEmail] = useState("")
    const [password, setPassword] = useState("")
    const [error, setError] = useState(null)
    const [showPassword, setShowPassword] = useState(false)
    const handleSubmit = async (e) => {
        setError("")
        alert("You are Signed In")
        try {
            await axios.post(`http://localhost:5173/api/signin`, {
            email, password
        })
        } catch (e) {
            if(e.res.data.message){
                setError(e.res.data.message)
            }
        }
    }
    const toggleShowPassword = () => {
        setShowPassword(!showPassword)
    }
    return (
        <div className="bg-[#0e387a] h-screen mx-auto'">
            <h1 className='text-center text-3xl text-[#9fafca] hover:text-[#b8df10] font-extrabold pt-10 pb-10'>Sign In Form</h1>
            {error ?(<div>{error}</div>):('')}
            <form className="max-w-sm mx-auto w-full" onSubmit={handleSubmit}>
                <div className="flex flex-col pt-10">
                    <label htmlFor="email" className="text-white">Email</label>
                    <input type="text"  className="border-none mb-3 rounded-md" onChange={e => setEmail(e.target.value)} value={email}/>
                    <label htmlFor="password" className="text-white">Password</label>
                    <div className="relative">
                        <input type={showPassword ? "text" : "password"}  className="rounded-md border-none pr-48" onChange={e => setPassword(e.target.value)} value={password}/>
                        <button type="button" className="absolute inset-y-0 right-0 pr-2 flex items-center" onClick={toggleShowPassword}> {showPassword ? <i className="fas fa-eye-slash fa-2x"></i> : <i className="fas fa-eye fa-2x"></i>} </button>
                    </div>
                    <button type="submit" className="rounded-full text-lg leading-4 font-medium bg-blue-500 hover:bg-sky-700 h-8 mt-5 text-white" onClick={handleSubmit}>Sign In</button>
                </div>
            </form>
        </div>
    )
}
export default Form
Inside the App.JSX file pass the Form component
import Form from './components/Form'
function App() {
  return (
      <Form />
  )
}
export default App
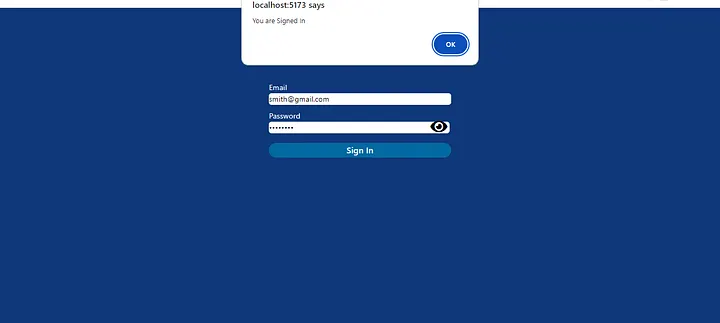
The results:


Import statement
React library is imported and the useState hook. Also the axios library is imported usually used to make HTTP request.Compoment declaration
A functional component form is defined.State Hooks
These are used to initialize a state variable and state fuction used to update the current state. Here the hook declares and initializes state variables (email,password,error,showPassword) inside the form component. These variables will be used to manage form inputs, error messages, and password visibilityForm Submission handling
The handleSubmit button is called when the form is sumitted. Prevents the default form submission behavior, clears any previous error and and displays a simple alert. It then tries to make a post request to an endpoint using the axios library, if any error in the response, It sets the error state based on the response message.Toggle Show Password
Toggles the visibility of the password, determines whether the password input field should display the actual password or masked characters.Form JSX
JSX is a JavaScript syntax extension in React. This includes the inputs fields for email and password, toggle button for password visibility and submit button. All styled using Tailwind CSS- Finally the form is component is exported to make available for use in other parts of the application.
Conclusion
In summary, this article talks about the React component for a simple sign-in form with email and password fields, including functionality for handling form submissions and toggling password visibility. It utilizes the axios library to make asynchronous HTTP requests. The styling is achieved with the Tailwind CSS. framework.
